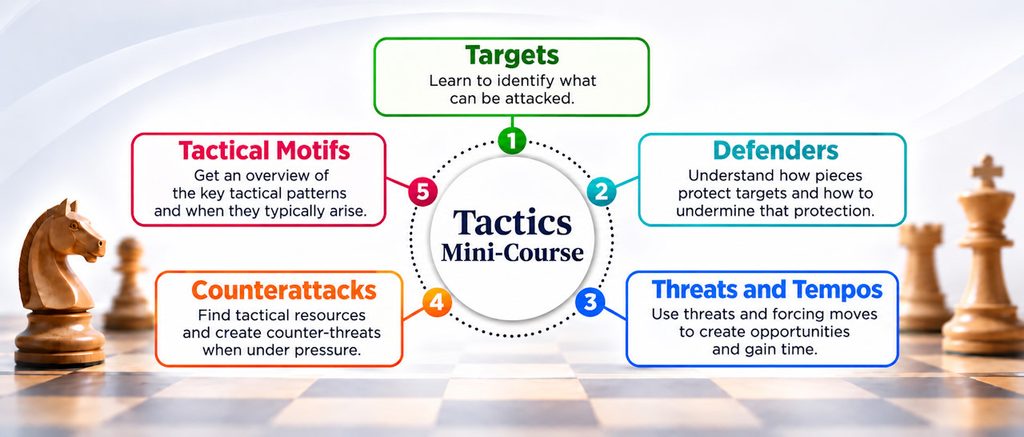
When people think about chess tactics, they often think of pins, forks, discovered attacks, and other familiar patterns. In this mini-course, we’ll take a step back and look at what makes these tactics possible in the first place.
We’ll explore five fundamental building blocks of chess tactics and see how they give rise to recurring tactical patterns. At the end, we’ll look at how you can put this knowledge into practice to further improve your tactical skills.
01 Targets
A target is anything you can attack or exploit. These can include undefended pieces, an exposed king, weak squares, and other vulnerabilities.
In this section, you’ll explore the common targets that create opportunities for tactical play.
Example of Targeting an Exposed King

Black to move. 1… Qb5+ 2. Kg2 (or Kg1) Qg5+, forking the white king and rook on c1.
An exposed king is a target that can be exploited either through a direct attack (since a king in check must respond) or in combination with other targets.
The example illustrates how we can exploit the weakness of an exposed king, in this case by using a sequence of checks to eventually set up a fork.
Example of Targeting an Undefended Piece

White to move. 1. Qc8+ Kg7 2. Qb7+ forks the exposed black king and undefended bishop.
In the initial position, the black bishop on b2 was undefended. Even though it was not under attack in the initial position, it later became a target in the tactical combination.
Example of Targeting a Pinned Piece

White to move: 1. Bc6! Qxc4 2. Bxd7+
In the example, the black bishop on d7 is pinned because moving it would allow Qxd8+.
Since a pinned piece cannot move without exposing another target, it can become a target itself. By attacking it, you may create additional tactical opportunities or even win the piece.
Example of Targeting an Important Defender

White to move. 1. Rd8! (attacking the important defender) Qxd8 2. Qxb7#
In the example, the black queen is an important defender of the rook on b7; otherwise, White could play Qxb7#. Because the queen is protecting something important, it becomes a target itself.
You can exploit a defender by attacking it directly, capturing it, or overloading it by forcing it to protect more than it can handle.
Example of Targeting a Higher-valued Piece

White to move. 1. Nf5! (gaining a tempo by attacking the higher-valued rook on d4) Rdd8 2. Ne7+
Even though the black rook on d4 was defended by a pawn, it is still a potential target for the lower-valued knight. Higher-valued pieces, usually the queen or rooks, are strong tactical targets because even when they are defended, they can often be threatened by a lower-valued piece.
Example of Targeting a Weak Back Rank

Black to move. 1… Ne2+ forks the white king and queen while also overloading the white rook, because 2. Rxe2 allows 2… Qb1+ 3. Re1 Qxe1#
This tactic exploits two targets: a weak back rank and an overloaded rook.
Example of Targeting a Trapped Piece

White to move. 1. c4! gains a tempo by attacking the black knight. Then, after 1…Ne7 2. c5, the black bishop is trapped.
A piece with limited mobility should be treated as a potential tactical target. In this example, White was able to trap the bishop on b6 completely.
02 Defenders
You’ve already seen how defenders can be vulnerable to tactics. In this section, we’ll look more closely at how defenders can be undermined.
Example of Targeting an Overloaded Defender

White to move. 1. Re8+ Rxe8 2. Qxd5 proves the Black rook is overloaded.
An overloaded defender is a piece that protects more than one important target, which makes it vulnerable to tactical ideas. In the example, the black rook on d8 defends the queen while also guarding the back rank.
The tactical idea shown here is known as the ladder trick. After 1. Re8+ Rxe8, the rook is pulled away from its defensive task, and the black queen loses its support.
Now we will look at in interesting tactical combination that removes 3 defenders in a row!
In the position below it is white’s turn to move. The title already gives you a clue as to what you should be looking for. Can you find the tactic that wins material?

Scroll down to see the solution.
.
.
.
The black bishop on e7 seems to be pretty well defended.

One would think that such a well defended piece will not be vulnerable to tactics? Wrong, this bishop is not safe! White can use a short combination of moves to remove all the defenders and then capture the bishop.

But not only does this move capture a defender, it also lures the black queen away from defending the bishop on e7.
Black pretty much has to play Qxd5, else he just lost a piece in any case.

The bishop has only one defender remaining. But white can deal with this too.

Nxc6 also creates the discovered attack threat – Qxd5. At the same time white is threatening the “in-between move” Nxe7+!
There is no way for black to deal with both threats: Qxd5 & Nxe7+. The best black can do is to play Qxc6 to prevent losing even more material.

Note that if black played Qxd1 (instead of Qxc6), then white would play Nxe7+, followed by Rxd1. In this case white would have kept his knight AND won the bishop, instead of just the bishop.

03 Threats and Tempos
Gaining a tempo is one of the fundamental aspects of tactical play. It means making a move that forces your opponent to spend time responding, because it creates a threat. Many tactical sequences involve a series of threats that gradually stretch or overwhelm the opponent’s defensive resources.
In this section, you’ll learn how to use tempos (checks, captures, and other forcing moves) to gain time and uncover tactical opportunities.
Using Threats to Create Tactical Targets
This lesson presents a simple exercise that demonstrates a very important tactical idea.
Diagram below: Black just played c5, attacking your queen. How would you respond?

Diagram above: White to move. What would you do?
White may be tempted to play 1.Qe5+ but it doesn’t lead to anything useful. Black could simply block the check by playing 1… Qe7.

Diagram above:1.Qe5+ Qe7 gives nothing special to white. White has a much better move.
Scroll down to see the solution.
.
.
Solution

Diagram above: 1.Qd5 threatens Qxa8
Notice how white makes use of a “intermediate threat” (Qd5, threatening Qxa8) in order to force the black rook to a square where it can be exploited in a tactic.

Diagram above: 1… Rb8 is the only safe square for the rook.
Any other move black could make would also lose material, but black will soon discover that the rook is not safe on b8 either.

Diagram above: 2.Qd5+ forks the black king and the undefended rook on b8.
This exercise also demonstrates two other important ideas:
- You can see why you should keep your king safe. A king that is exposed to checks is often vulnerable to tactical combinations.
- You can see why it is important to protect your pieces and to not leave them hanging (undefended). Even if the undefended piece is not vulnerable to a tactic yet, your opponent gets the opportunity to gain an important tempo by making a threat against the undefended piece. (The point is that gaining a tempo in this way can be useful in preparing for a tactic on the next move.)
Even though the solution to this exercise is fairly simple you can easily miss it in your own games if you are not familiar with the idea. In fact, building your familiarity with tactical ideas is why it’s so important to study tactics if you want to improve your game.
04 Counter Threats
When making a threat, you cannot always assume that your opponent must respond to it immediately. In some positions, they can gain a tempo by creating a counterthreat of their own.
Know Your Opponent’s Threats
Understanding your opponent’s threats is the first step in effective chess calculation. Just as you search for tactical opportunities, you should also search for your opponent’s threats. Before planning your own moves, you must first understand what your opponent is trying to achieve.
If you observe a serious threat, you must either neutralize it immediately or create a stronger counter-threat—but be careful, counter-threats are tricky!
Taking time to recognize threats has a psychological benefit too. Knowing what the threats are helps you feel calmer and focus on the right response. Otherwise, you carry an underlying fear of the unknown, which can negatively affect the clarity of your thinking. And, if there are no serious threats, you know you are free to explore your options.
Examples of Knowing the Threats
05 Tactical Motifs (Patterns)
Tactical ideas often arise from the interactions between pieces: what they attack, what they defend, which squares they control, and how they affect one another. Understanding these interactions helps you recognize weaknesses and identify opportunities to exploit them.
We’ll first look at some common piece interactions and how they create tactical opportunities. Then we’ll explore how these interactions give rise to recurring tactical patterns, known as tactical motifs.
Types of Interaction Between Chess Pieces
There are primarily 4 types of interaction between the pieces and pawns. These are:
- Attacking
- Defending
- Controlling
- Obstructing
These interactions are best explained by examples. (The diagrams and comments below will clarify it. Looking at these examples is in itself a good exercise.
Attacking
“Attacking” simply refers to the fact that a piece can capture an enemy piece on the next move. This does not mean that you will capture the piece, of course, or that it is even a good idea to do so, but you must be aware of this interaction. We will use the position in the diagram below (white to move) to give examples:

- The white bishop on c4 attacks the black pawn on f7.
- The white bishop on e3 attacks the black pawn on a7.
- The black queen on a5 attacks the white pawn on a3 and the white knight on c3.
- The black bishop on g7 attacks the white knight on c3.
- The black knight on g4 attacks the white bishop on e3 and the white pawn on h2.
Important vs Unimportant Interactions
Some of the observed interactions will be practically unimportant and you will discard them quickly. However, the interactions you discard may be more significant than you initially realized.
Example: In the diagram below you may quickly discard that the black queen can capture the white pawn on a3 because it is defended…

…however, if the white pawn on b2 moves, then the pawn on a3 will be hanging–and this is, in fact, a useful observation.
The lesson here is that you should observe all possible interactions, regardless of whether they appear important, or not. If you skip this step you will miss out on exciting tactical opportunities!
Many of the interactions presented on this page may seem elementary to an amateur. But in the eyes of a master they are the key to all the tactics that hide in the position. Learning to observe these interactions will have an immediate effect on your tactical skill, for the better.
Defending
A piece that supports another piece is known as a “defender”. For example:
- The white queen on e1 defends the white knight on c3 and the bishop on e3.
- The white rook on f1 defends the white pawn on f4 and the queen on e1.
- The white bishop on e3 defends the white pawn on f4.
- The white king on g1 defends the white pawn on h2.
- The black bishop on c8 defends the black knight on g4.
- The black rook on a8 defends the black pawn on a7 and bishop on c8.
- The black king on g8 defends the black pawn on f7.
Due to its important role, a defender can in itself become vulnerable to tactical ideas, particularly to tactics that involve removing that defender in some way.
Controlling
A piece or pawn controls a square if it could potentially capture an enemy piece moving to that square. Here’s a few examples:
- The white pawn on a3 controls the b4-square.
- The white pawn on f4 controls the g5-square and e5-square.
- The white knight on c3 controls the a4-square and the e4-square.
- The white bishop on e3 control the c5-square and the d2-square.
- The black pawn on c6 controls the b5-square and d5-square.
- The black rook on d8 controls some squares on the d-file.
- The black queen on a5 control some squares on the 5th rank.
Not all control is absolute
Obviously, attacking a square does not mean you have absolute control over that square. In most cases both sides will be fighting for control over certain squares and every piece that attacks that square will add to your control of it. Note however that, due to their relative low value, pawns usually play a more significant role in controlling squares.
Obstructing
Obstructing is when a piece or pawn obstructs the movement of another piece or pawn by occupying a square in its way.
Obstructing a piece can work favorably (the pawns in front of your king protects him by obstructing enemy pieces) or unfavorably (the mobility of a piece can be limited because other pieces obstructs it). For example:
- The white pawn on b2 obstructs the white rook on b1’s view of the b-file.
- The white knight on c3 obstructs the black queen’s view of the d2-square and the e1-square and similarly obstructs the view of the white queen on e1.
- The white bishop on e3 obstructs the white queen on e1’s view of the e-file, particularly of the undefended pawn on e7.
- The white pawn on f4 obstructs the white rook on f1’s view of squares on the f-file beyond the 4th rank, particularly of the f7-square.
- The white pawn on f4 also obstructs the view of the white bishop on e3’s view of the g5-square and the h6-square.
- The black pawn on f7 obstructs the white bishop on c4’s view of the black king on g8.
- The black knight on g4 obstructs the black bishop on c8’s view of the h3-square.
Now that you’ve seen examples of the 4 primary types of interaction between the pieces, pawns and squares, let’s take this to the next level!
The Consequences of Moving a Piece
Every move on the chessboard has consequences. Why is it important to continually observe these consequences? Because your tactical awareness depends on it! Now you may be asking: “But there are so many interactions on the board, how could I possibly keep track of it all?”
Here’s a very helpful technique:
There is no need to restart your observations on every move. Instead, you can simply focus your attention on the consequences of the last move.
You should do this right from the start of the game! For example, what are the consequences of white’s first move in the diagram below?

The immediate consequences of white’s first move is that it:
- clears the white queen’s view of the d1-h5 diagonal,
- clears the white bishop on f1’s view of the f1-a6 diagonal,
- gives up its control of the f3-square and d3-square,
- gives up its future control of the f4-square and d4-square,
- gains some control over the f5-square and the d5-square,
- obstructs the diagonals that pass through the e4-square (this last observation is particularly relevant to the development of the bishops).
For the rest of the game then, you should similarly observe the consequences of every new move in the position.
Practice Exercise
To help you on your way, let’s consider a few more moves in the position we already know. In the diagram below, what are the consequences of white’s move 1.b4?
Hint: The consequences of a move usually consist of 1) what it does and 2) what it doesn’t do anymore. Its a useful habit to first consider what it doesn’t do anymore.

- The white pawn on a3 is now undefended.
- The white knight on c3 now has one less defender.
- The white pawn on b4 attacks the black queen on a5.
- The white pawn on b4 now controls the c5-square.
After 1.b4, black didn’t feel comfortable to play 1… Qxa3 since white could play 2.Rb3 and it’s not quite clear how black will respond. Either way, black found a better way to continue and played 1… Qh5! What are the consequences of black’s move?

Here’s the consequences you should observe:
- The white pawn on a3 is not under attack anymore.
- By moving their queen, black cleared the a5-square–which implies black could potentially play a7-a5 later on.
- The black rook on d8 is now undefended. (This is not an immediate problem for black because white can’t effectively attack the rook.)
- The black queen attacks the white pawn on h2. In fact, black is threatening to play Qxh2# (this consequence will obviously take priority!) Since black is threatening checkmate, white can only consider moves that remove this threat.
- The black queen gives additional support to the knight on g4.
What are the consequences of white’s next move, 2.h3?

- By moving the white pawn to h3, it gives up control over the g3-square. Even though black can’t take advantage of this fact right away it is still a good habit to recognize this consequence.
- The white pawn on h3 obstructs the black queen’s view of the h2-square, protecting the white king against the checkmate threat.
- The white pawn on h3 attacks the black knight on g4.
Black captures the white bishop on e3 with the knight, 2… Nxe3. What are the consequences of this move?

Black’s move, 2… Nxe3:
- gives up control of the h2-square and the f2-square.
- removes the attacker of the black pawn on a7.
- clears the g4-square, which opens the view of the black queen on h5 and of the black bishop on c8.
- attacks the white rook on f1.
- attacks the pawn on c2 and the pawn on g2.
- attacks the bishop on c4.
- removes an important defender of the white king on the dark squares.
- draws the white queen to the e3-square where it will become a new target for black’s pieces.
White plays 3.Qxe3. This move is maybe not the best but other moves aren’t much better. Either way, white is losing material due to the tactical combinations in the position.

White’s move, 3.Qxe3, has these consequences:
- The queen still defends the knight on c3, but from a new position.
- The white queen gives up control of the h4-square.
- The new geometric relation between the white queen and white king (pieces on the same diagonal) allow black to employ a pin tactic.
- The queen attacks the pawn on a7, but this doesn’t matter because the rook on a8 defends it. In any case, there are other matters in the position that are much more important!
- The queen attacks the pawn on e7. In the light of black’s next move, this also doesn’t matter.
Black’s moment has finally arrived:

Black plays 3… Bd4 and pins the white queen to the king.
Of course, observing the consequences does not replace calculating variations, but it does help your tactical awareness. In other words, keeping track of the interaction between pieces, pawns and squares can provide useful information to aid your calculations.
The mere thought of having to apply this to your game may initially feel overwhelming and unnecessary. However, by simply practicing it a few times and adopting the habit in your thinking process, you will be surprised ho
How to get better at chess tactics
any chess players try to improve their tactical skill by solving tons of chess puzzles. This is helpful, but there is a better way to train tactics.
Why Solving Tons of Chess Puzzles Is Not Optimal for Training Tactics
There are more tactical ideas to learn than you may realize! Maybe you’ve heard about pins, forks, discovered attacks, removing the defender, a weak back rank etc. These are the well-known tactical patterns (or motifs).
But the list goes on: Interference, decoy, x-ray… And going from one puzzle to the next is not an effective way to learn about all these tactics. To effectively master tactical patterns, it’s a good idea to study each unique pattern as a subject.
A Better Way to Train Chess Tactics
Working on your tactics is indeed the quickest way to improve your chess. But to help you do it right, here’s a summary of what an effective chess tactics training method looks like:

1. Study Tactical Patterns (Motifs)
The tactical combinations that appear in chess puzzles often share recognizable patterns and ideas. Such typical patterns and ideas are referred to as “themes” or “motifs.”
What is a Chess Tactics Pattern?

In essence, tactical patterns (or motifs) are ways to create or exploit targets in your opponent’s position.
There is usually much more to a chess tactics pattern (or motif) than appears on the surface. By making an in-depth study of a specific motif, you will improve your understanding of how the motif works in different situations.
Furthermore, this way of study will help you notice interesting and “less-obvious” ways in which these motifs can be used.
I will show you an example to prove my point:
Hidden idea behind the discovered attack
Let’s start by looking at the discovered attack motif in its simplest form:

Now let’s have a look at the next position:

The key to finding the solution in the above example, is to have a good understanding of the discovered attack motif.
The hidden idea: All the squares beyond the Bd3 (d4-d8) are indirectly attacked by the Rd1 (due to the possibility of the discovered attack, Bxh7+).

As you can see, a good understanding of how the motifs work, will help you find more tactics in your games.
More Reasons Why You Should Study Chess Tactics Patterns:
It’s important to learn chess tactics patterns because:
- Your knowledge of the important patterns will help you calculate variations more effectively.
- Your overall tactical awareness will improve and you will instinctively know when and where to look for tactical opportunities
- You will make fewer mistakes and be able to take advantage of your opponent’s mistakes.
- You can achieve strategic advantages by means of tactical combinations.
Tips on how to study tactics by motif
This is hard work, but well worth the benefit you will get from doing so. Here are some tips on how to study chess tactics by motif.
- Study a collection of tactical puzzles that feature specific patterns (motifs). Try to find unique examples that illustrate various ways in which the motif can be used.
- Identify the targets that were exploited by the motif. A motif is in essence a way to exploit targets. By studying how the targets were exploited, you will also get a better understanding of the motif.
How Many of the Important Chess Tactics Patterns Do You Know?

Strong chess players know them all by heart because they know it helps them calculate deep variations.
This is why many chess coaches say it’s important to train tactics, and it’s true. But, it is even more important to train patterns!

To make thing a bit easier, I created a chess tactics course that will help you master all the important patterns (motifs):
20 Important Tactical Motifs is an interactive video-course that helps you make an effective study of the most important chess tactic motifs.
2. Improve Your Chess Tactics Vocabulary
In any field of expertise, a good vocabulary on the topic reflects the depth of your understanding. This fundamental idea is true in chess too. Expanding your vocabulary in the field of chess tactics is the foundation of an effective chess tactics training method.
Definition of Chess Tactics
A chess tactic is a move (or a forced combination of moves) whereby you achieve an objective. Even though tactics are mostly known as ways to win material or give checkmate, it can also be used to achieve strategic objectives.
If you want to get better at chess tactics, be sure to know and understand the meaning and implication of the important words and phrases related to chess tactics. It will serve as the foundation from where you can further develop your tactical skill.
Tactics vocabulary

- A Threat. A threat is a move that threatens to obtain an advantage on the next move, such as capturing a piece, threatening a tactical combination or even securing a positional advantage.
- Counter-threat. A counter-threat is a move whereby you effectively ignore a threat against you but make an even stronger threat against your opponent. Counter-threats can be very effective, but there are risks involved and you should calculate the consequences carefully.
- Winning a tempo. Winning a tempo refers to a useful move that improves your position and makes a threat at the same time – and forces your opponent to defend in a way that isn’t useful to them. In essence it means you get a “free move”. Making tempo-moves can often lead to the discovery of tactical opportunities you couldn’t foresee in the previous position.
- Targets. A target is a piece or square that is vulnerable to a potential threat. Typical examples include an exposed king or undefended pieces.
- Defenders. A defender is a piece that defends/supports other pieces or squares.
- Exchanges. An exchange refers to the event where you capture an enemy piece and they recapture you in return. Exchanges bring about important changes to the position and can often be used to remove important defenders or to create new targets.
- Tactical motifs. A motif is a tactical idea you can use to exploit targets. Pins, forks and discovered attacks are typical examples of tactical motifs.
Note: Threats vs Winning a tempo.
Not all threats are useful. A threat only wins a tempo if it forces your opponent to defend passively. If your opponent can defend in a way that is also useful too, then your move didn’t win a tempo.

For a more detailed description on chess tactics vocabulary, refer to the article:
Chess vocabulary: Important words in the language of tactics
Tactics, targets and winning tempos
Moves that win a tempo are always moves that make a threat against a target. A good awareness of the targets in your opponent’s position can go a long way in helping you find effective tempo moves.
Examples of Targets
Undefended pieces (or “hanging” pieces) often present opportunities for you to win tempos since it’s easy to make threats against them. Undefended pieces can sometimes be captured in a tactical combination.
An exposed king is often the most vulnerable piece on the board. Since a player’s responses are severely restricted when their king is in check, “check-moves” can be used to win tempos. You can also look for ways to combine a threat against the exposed king with threats against another target, such as an undefended piece.
A piece with important defensive tasks (a defender) is required to stay in its position to fulfill its defensive role. Logically then, this piece can itself can become a target.
A piece with severely limited mobility can sometimes be trapped or you can make a tempo-move by threatening to trap that piece. The trapped piece can be won by tactical means or you can further restrict that piece and prevent it from becoming useful to your opponent.
3. Develop Your Tactical Awareness
How do you know when to look for tactics in the position?
In a real game you do not have enough time to be looking for tactical combinations with every move. Even if you do have enough time you will exhaust yourself to such an extent that your level of performance might even unknowingly drop.
Knowing when to look for tactical combinations is a skill which is just as important as the skill of finding tactical combinations. The key to know when to look for tactical combinations is to develop a tactical awareness. The exercises on this website are developed with this in mind. You will not only train the skill to find tactical combinations but you will train your mind to instinctively know when it is worth to spend time on searching for a tactic.
Here’s the best way to improve your tactical awareness:
Study the Solutions of Tactical Puzzles
- Don’t move on to the next chess puzzle until you have a deep understanding of the patterns that made the tactics possible in the puzzle.
- See if you can figure out which aspects of the position actually made the combination possible. This style of chess tactics training will hone your “tactical awareness.” You will begin to instinctively look for chess tactics themes in positions where you see telltale signs of these tactics.
- Summarize the tactical solution with a short sentence. This short sentence will answer the essence of what the tactic in the position is all about.
Train tactics in repeat-cycles
Chess tactics should be studied in repeat-cycles. In martial arts, there is a famous quote by Bruce Lee:
I fear not the man who has practiced 10000 kicks once, but I fear the man who has practiced one kick 10000 times.
How often do you go back to specific chess tactics puzzles that you did a while ago? For some strange reason, I’ve noticed that chess players tend to think it is a waste of time to repeat a puzzle they’ve seen before. This is very far from the truth.
A professional golf-player will practice one aspect of his swing over and over and over… Why then should we not do the same when solving chess puzzles? Coming back to a certain set of puzzles once in a while can help your mind to not only understand the pattern or theme better, but also to automate your mind’s recognition of the patterns.
Chess tactics servers can be a great source of chess puzzles where you can do chess tactics training. One such place is the chesstempo.com chess tactics server.
It is vital to make this knowledge your second nature. It is better to understand a few patterns deeply than to understand many patterns superficially. Patterns you understand deeply will be much easier to apply!
Understanding the tactical themes is useful… but training your mind to recognize the theme instantly and apply it in your game is only possible once you have turned your understanding into a skill. So how do you turn your understanding into a skill? Practice, practice, practice. Practice till you can apply your understanding almost without thinking.
4. Fine-tune Your Calculation Method
Your calculation method is another very important aspect of your development as a chess player. A well-developed calculation skill will help you avoid mistakes, but more importantly – it will also increase your confidence!
On Day 1 of the 10-Day Chess Challenge I present a 5-step calculation method. If you are looking for a guide on how to calculate chess tactics method will help you a lot:
Summary of the 5-step Chess Tactics Calculation process:
Here are the steps I demonstrated in the video.
- Find opponent’s threats
- Identify tactical targets and motifs
- Calculate all the checks
- Calculate all the captures
- Calculate all the tempo-moves
But you must also keep in mind that your ability to calculate chess tactics will rely heavily on your visualization skills.
5. Improve Your Visualization (Chess Vision)

Visualization refers to your ability to see in your mind the positions you will reach if certain moves were to be made. The point is that you can see this imaginary positions in your mind without moving the actual pieces on the board.
The skill to visualize possible tactics in your mind long before they actually appear on the board, gives you a serious advantage over any opponent who can’t do it.
Your visualization skill will improve over time by simply playing chess often and by spending a lot of time on training chess tactics. However, if you find that you often think about your next move and end up looking again and again at the same variations – you may want to give your visualization skill a boost. This is exactly what the revolutionary Visualwize training program will help you achieve.
Why an Effective Chess Tactics Training Method Is an Important Aspect of Your Overall Chess Improvement
It’s a great feeling to achieve a good position, particularly when you achieve it against a strong player. But the same great feeling can quickly turn into frustration if you just can’t find a way to take advantage of your superior position.
On an amateur-level, tactics often become possible as a consequence of an oversight or a mistake. But among stronger players, tactical opportunities mostly appear as the result of a better position.
Bobby Fischer said it best:

We can conclude that your ability to convert a good position into a concrete advantage relies very much on your tactical skill.
So Then Chess Really is 99% Tactics?

Chess is 99% tactics – R Teichmann
This quote has often been debated by chess players. Some claim that it’s a complete exaggeration. It probably is, but it draws needed attention to the importance of training tactics – which believe was Teichmann’s intention when he said it in a manner of speaking.
Tactics are critical, a requirement, because one oversight can end the game right away. But you need to think about your strategy too!
The two most important questions in your mind should be:
- Are there any tactics in the position? (Refers to chess tactics)
- How can I improve my position? (Refers to chess strategy)

Did my opponent’s last move make any new tactics possible? If I play my intended move, will it give my opponent new tactical opportunities? These questions will of course be a lot easier to answer once you get better at chess tactics!
Tactics help you win games in style (and to spot your opponent’s tricks before they happen to you!)
What’s Next?
Understanding the building blocks of chess tactics gives you a better foundation for recognizing and exploiting tactical opportunities. The next step is to put these ideas into practice through purposeful training.
Visit the Tactics Training Room to explore more lessons, practice exercises, and resources to help you develop your tactical skills.