I recently came across a tactical puzzle that is worth studying. It combines several simple tactical ideas that are difficult to see from the starting position.
In the position below, White is to move. Black is threatening both the rook on e8 and the bishop on b3.
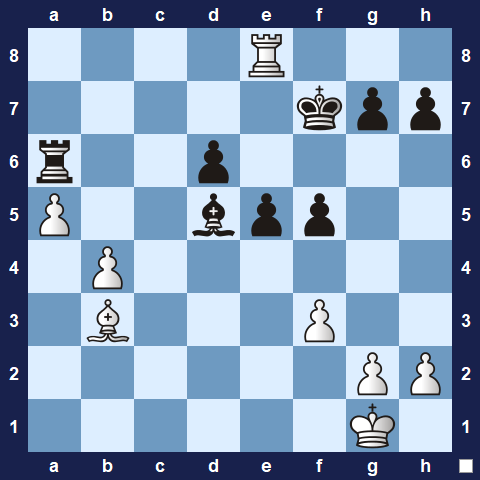
Diagram above: White to move. Can you find the tactic?
Take a minute to try to find it yourself before looking at the solution.
Note: If you did not find the tactic, White’s next best move is 1. Ba4, moving the bishop to safety while also defending the rook on e8.
.
.
Solution
1. Ra8! creates two threats: the obvious 2. Rxa6, and 2. Bxd5+, since the king can no longer capture on e8.
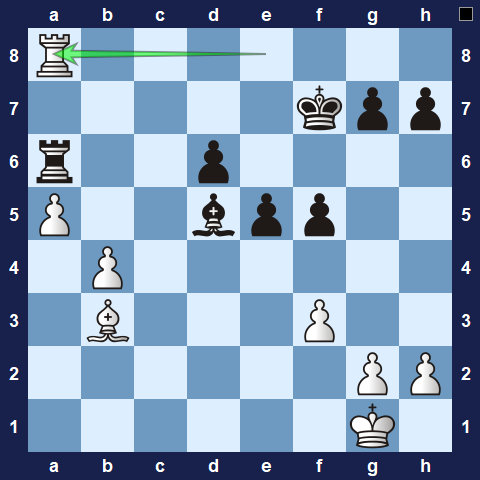
This move is difficult to find because the rook on a8 is completely undefended. However, Black’s bishop cannot capture it because the bishop on d5 is pinned, while capturing with the rook allows a fork.
If Black plays:
1… Rxa8
White continues with:
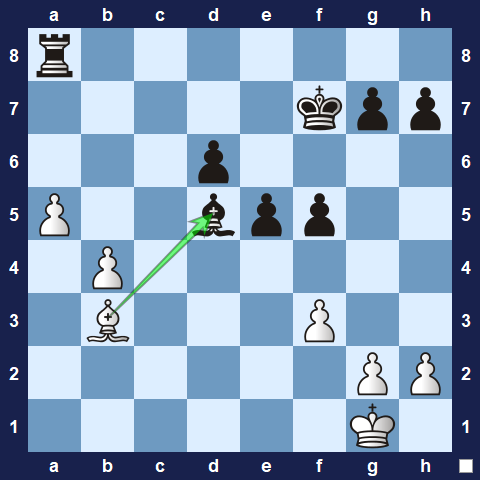
2. Bxd5+, recapturing the bishop and, after the Black king moves out of check, White’s bishop can capture the rook on a8.
Why This Example Is So Instructive
This example combines a few simple ideas. In the initial position:
- The bishop on d5 is pinned.
- The rook an a6 is undefended
- The a8-square is indirectly defended by a potential fork (Bxd5+).
Each idea is relatively simple on its own. The difficult part is even considering 1. Ra8, because leaving the rook undefended seems so unnatural. That is what makes the tactic so difficult to find.
This is why regular study of tactical patterns is so important. Over time, your mind becomes trained to consider ideas that would otherwise seem counterintuitive.
300 Essential Tactical and Checkmate Patterns
My collection, 300 Essential Tactical and Checkmate Patterns, includes 200 tactical patterns grouped by theme, along with 100 checkmate patterns. By studying these 300 puzzles several times, you can build a solid understanding of the most important tactical ideas in chess.